How to add and verify a wallet address
This step-by-step tutorial shows you how to verify a wallet address and link it to your Mt Pelerin profile, so that you can buy, swap and cash out crypto directly on it.
 10 minutes|Yann Gerardi|Published 2023-04-29|
Verifying the wallet addresses used with our exchange service is a regulatory requirement: we have to make sure that an address really is under your control. Verification is only done once per address, the first time you use it with us. We offer as many verification methods as possible, and most of them are free and instant: you either connect the wallet, or you sign a short message with it. Wallets that can do neither are verified with a Satoshi test, a small transaction sent from the address itself, which is usually confirmed within 15 minutes and can take up to 48 hours.
What a verified address lets you do
A wallet address added to your Mt Pelerin user profile and verified with us allows you to use our web app and our mobile app Bridge Wallet to:
- Buy crypto on it
- Swap crypto to and from it
- Cash out crypto from it
- Attach a personal IBAN to it
- See its content from Bridge Wallet
You only have to verify an address once. After that, it stays in your profile and you can select it again for any future transaction without verifying it a second time.
Before you start
If not already done, you first need to create a user profile with us. You can do so:
With our web app
- Go to our web app
- Click on the Profile tab in the left side menu
- Click on SMS
- Do the SMS code confirmation
- Provide your email address
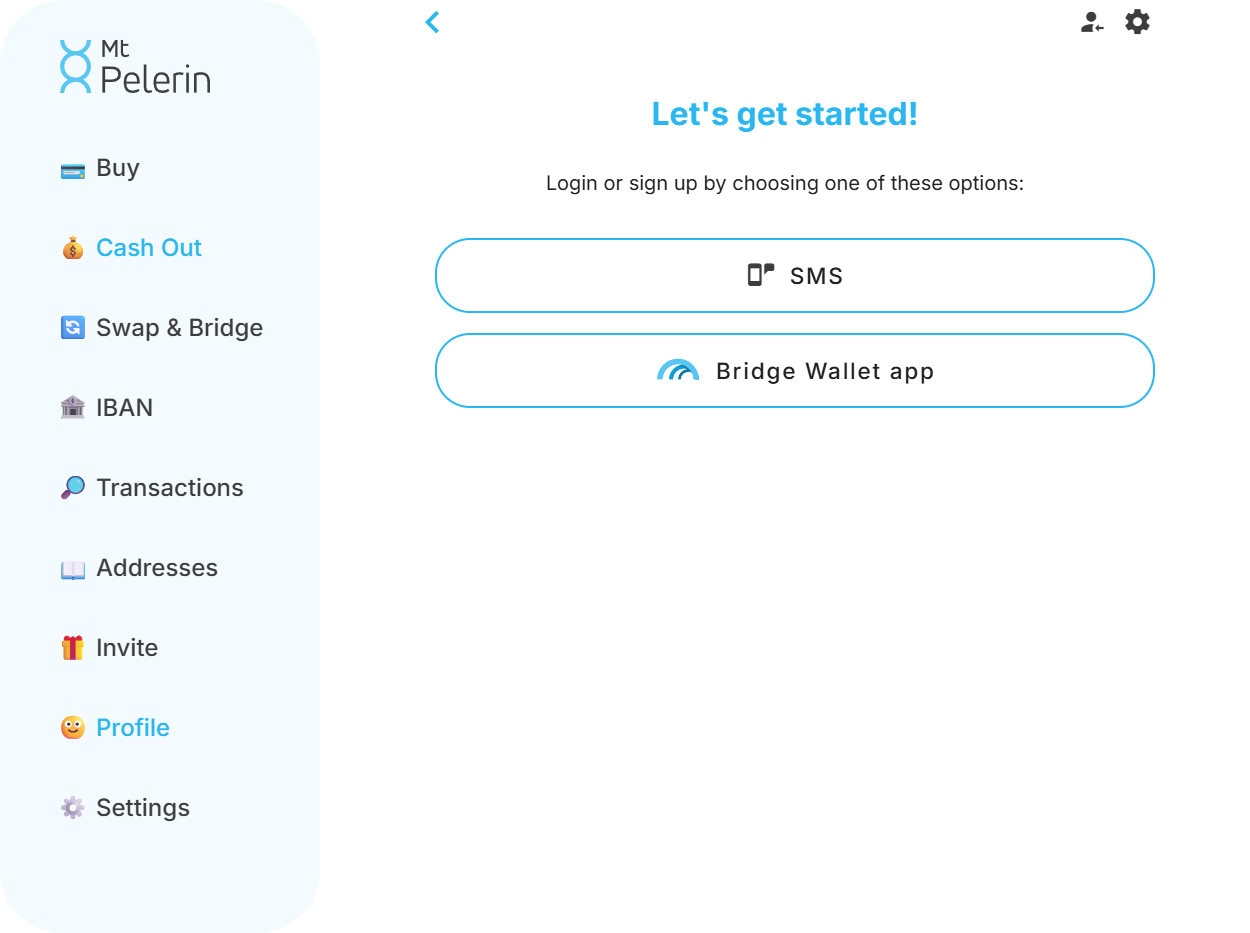
Only choose the Bridge Wallet app option if you have already created a user profile by signature with Bridge Wallet.
With Bridge Wallet
Download and install the app, then create or restore a wallet. You will then be asked to create a user profile or reconnect to an existing one.
How to verify a Bitcoin address
- Go to our web app
- Click on the Addresses tab in the left side menu
- Click on Add a wallet
- Select Bitcoin
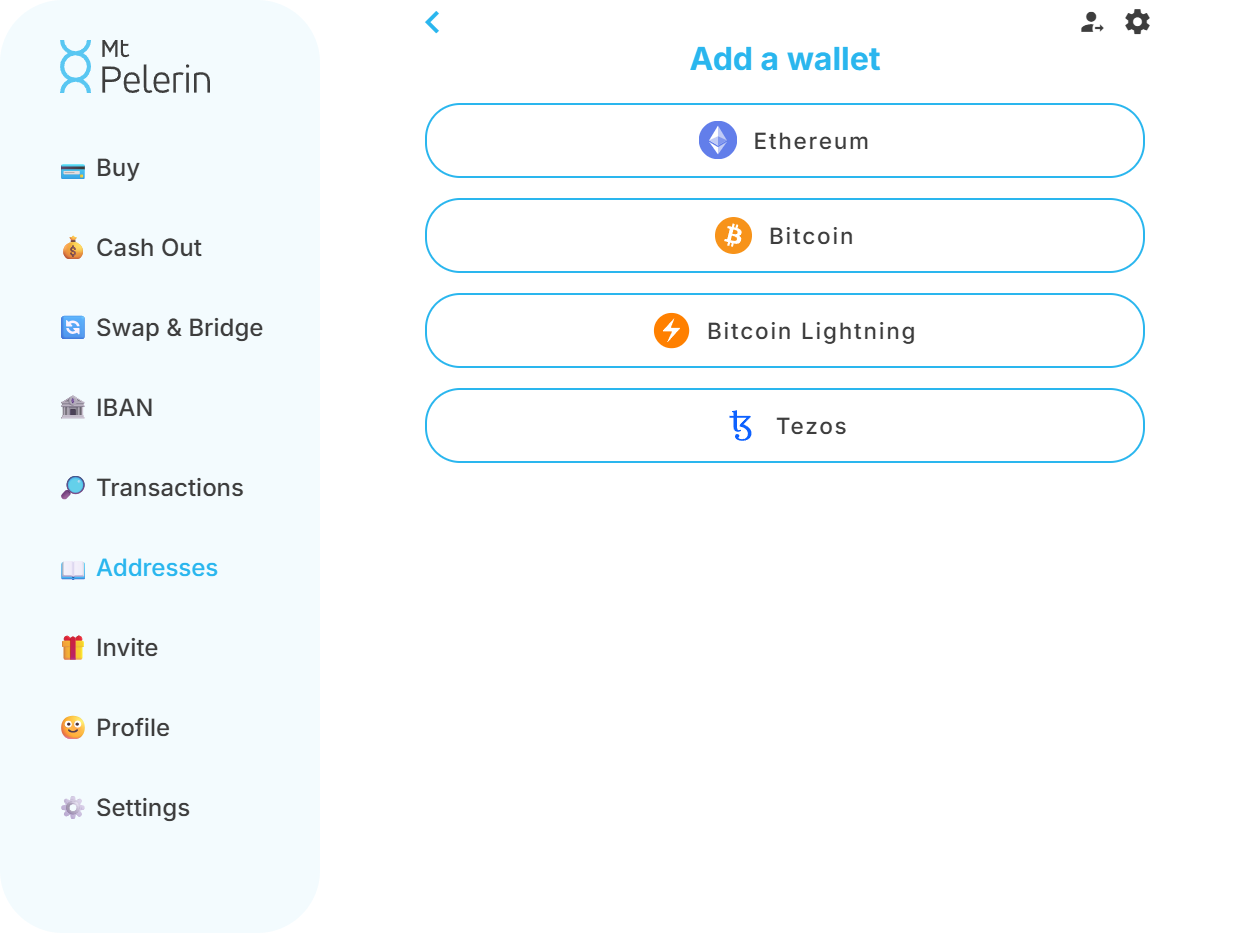
You will then see the following options:
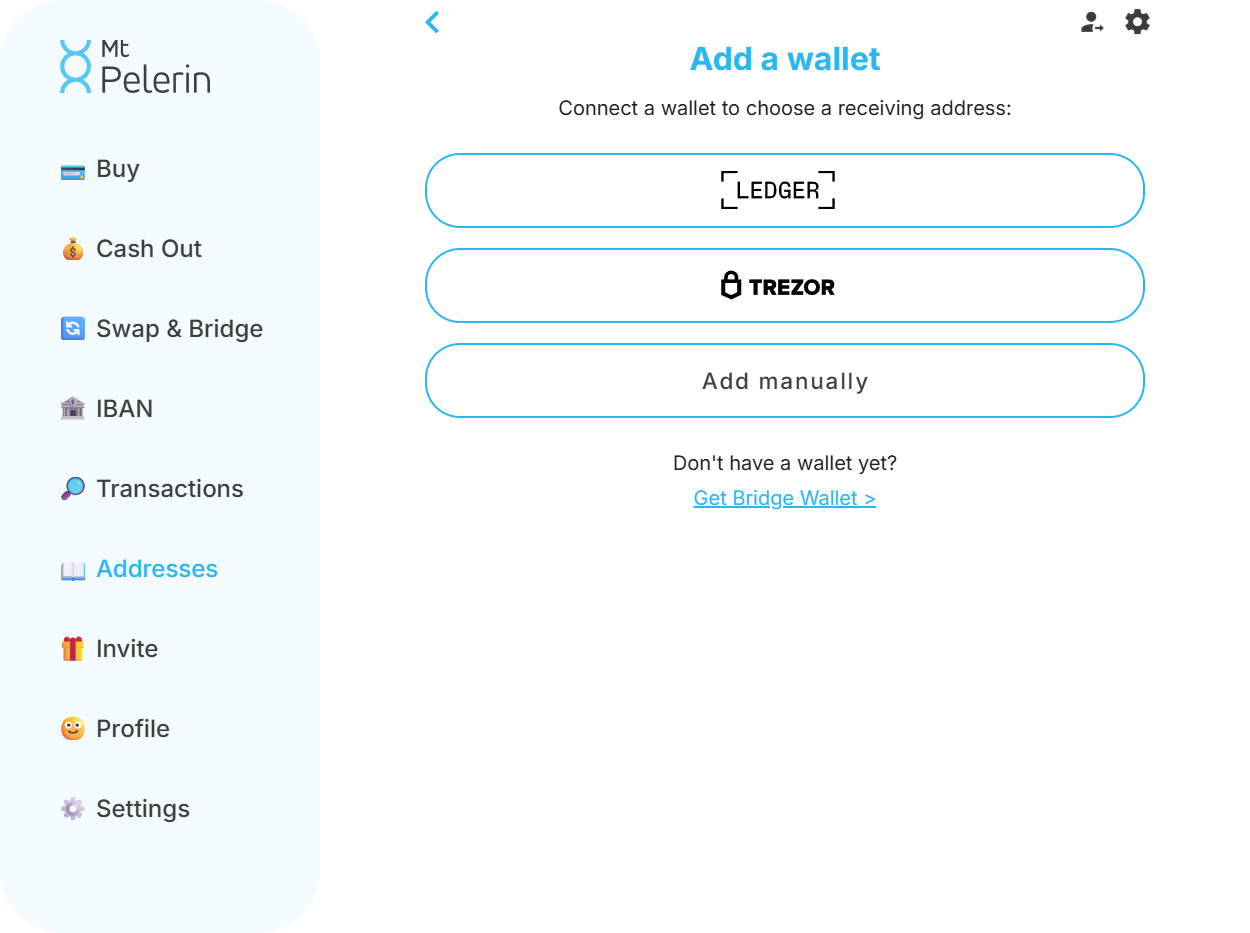
a. With a Ledger or a Trezor
- ✅ This method is free and instant.
- Connect your Ledger or Trezor to your computer
- Make sure that it is up to date, unlocked and opened on the Bitcoin app/account
- Choose the Ledger or Trezor button on our web app
- Approve the signature request that will appear on your hardware wallet
b. By message signature
- ✅ This method is free and instant.
- Choose Add manually
- Enter your Bitcoin wallet address
- Choose the Message signature tab
- Copy the message and run it through the signing function of a Bitcoin wallet that supports signing messages, such as BlueWallet, Sparrow, Electrum or Trezor
- Copy the signature result in your wallet, and paste it in the Signature field of our interface
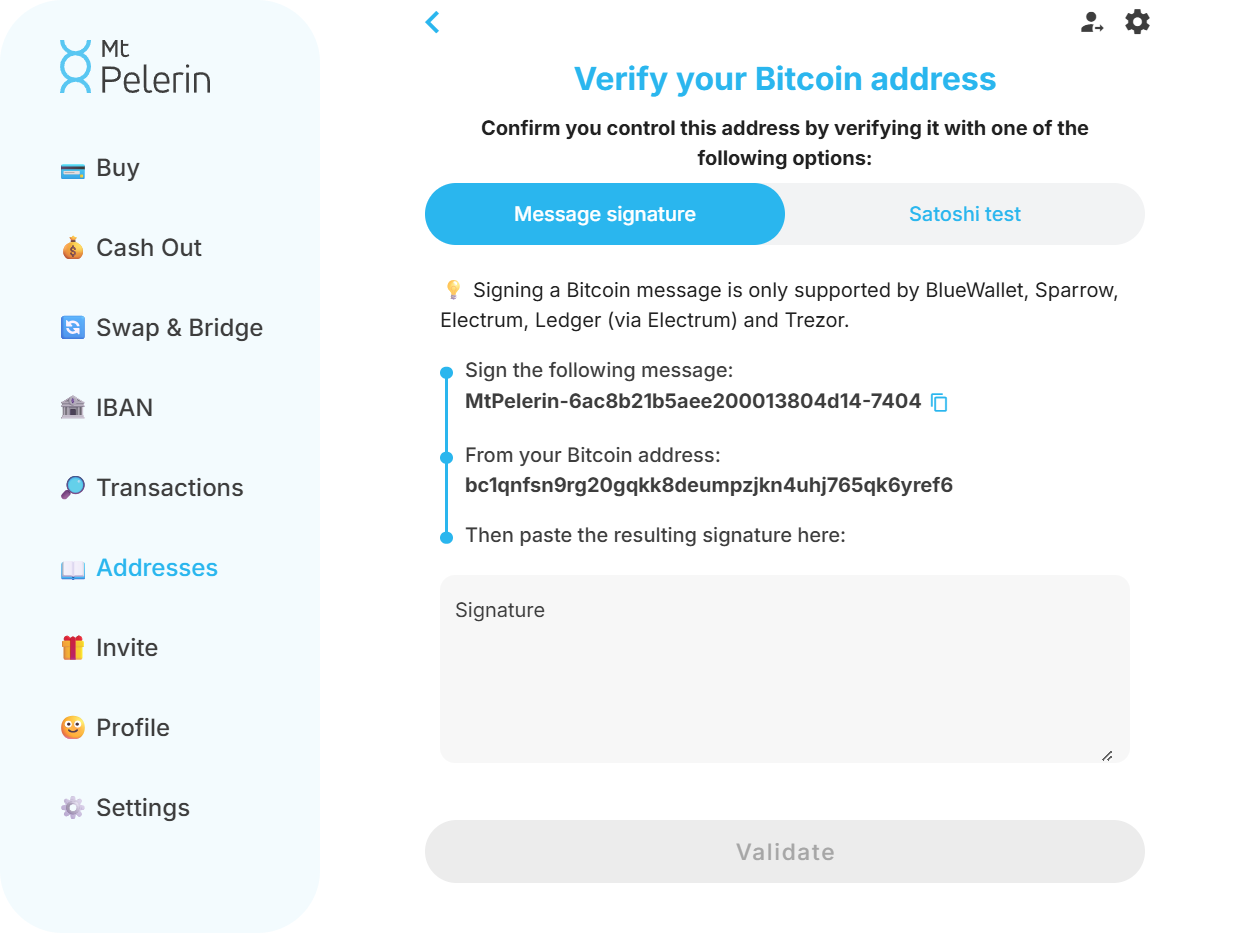
- 💡 To sign a Bitcoin message with a Ledger, you will need to use it through Electrum. Please refer to this tutorial.
c. From any other Bitcoin wallet
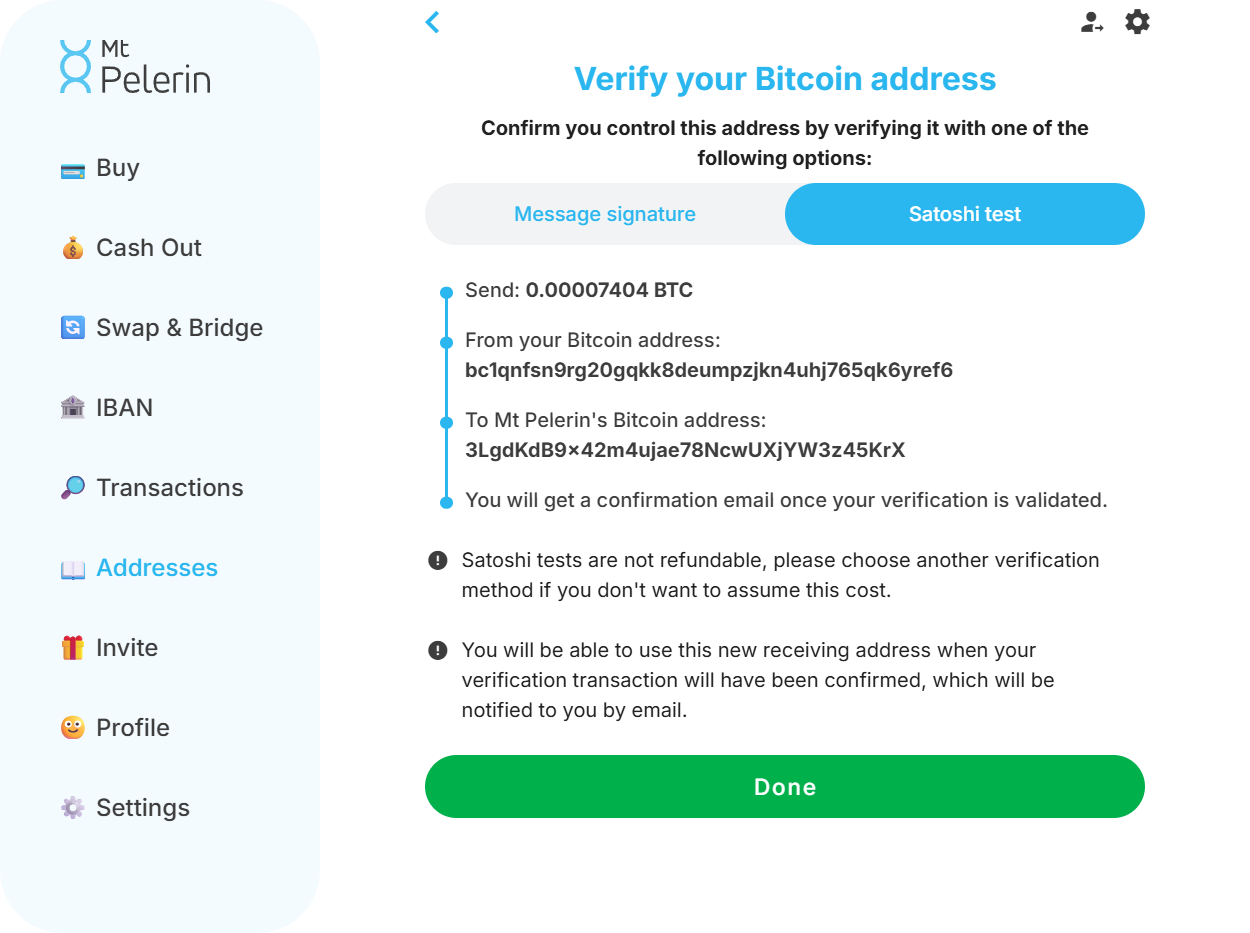
You will need to make a Satoshi test, a transaction of a small, precise amount of BTC sent from the address that you want to verify to our verification address.
- Choose Add manually
- Enter your Bitcoin wallet address
- Choose the Satoshi test tab
- Follow instructions to make your verification transaction
Make sure to send the exact amount indicated, down to the last decimal, as it is a unique code required for our system to automatically detect and validate your transaction.
In Bridge Wallet
Switch to the Bitcoin network, go in the address book tab, click on the "Add" button, enter your address and follow instructions to make your verification transaction.
- ⚠️ The amount you send is not refundable. If you would rather not pay it, use one of the two instant methods above.
- 💡 To send the transaction to your own address instead of ours, verify your address from our mobile app.
How to verify an Ethereum or EVM address
A wallet address is the same on Ethereum and on all Ethereum-compatible networks, so this section applies if you want to verify an address on Arbitrum, Avalanche, Base, BNB Chain, Celo, Gnosis Chain, Optimism, Polygon, Rootstock, Sonic, Tempo or zkSync Era. You can link an address from any of these chains, and use it on all the others.
- Go to our web app
- Click on the Addresses tab in the left side menu
- Click on Add a wallet
- Select Ethereum
You will then see the following options:
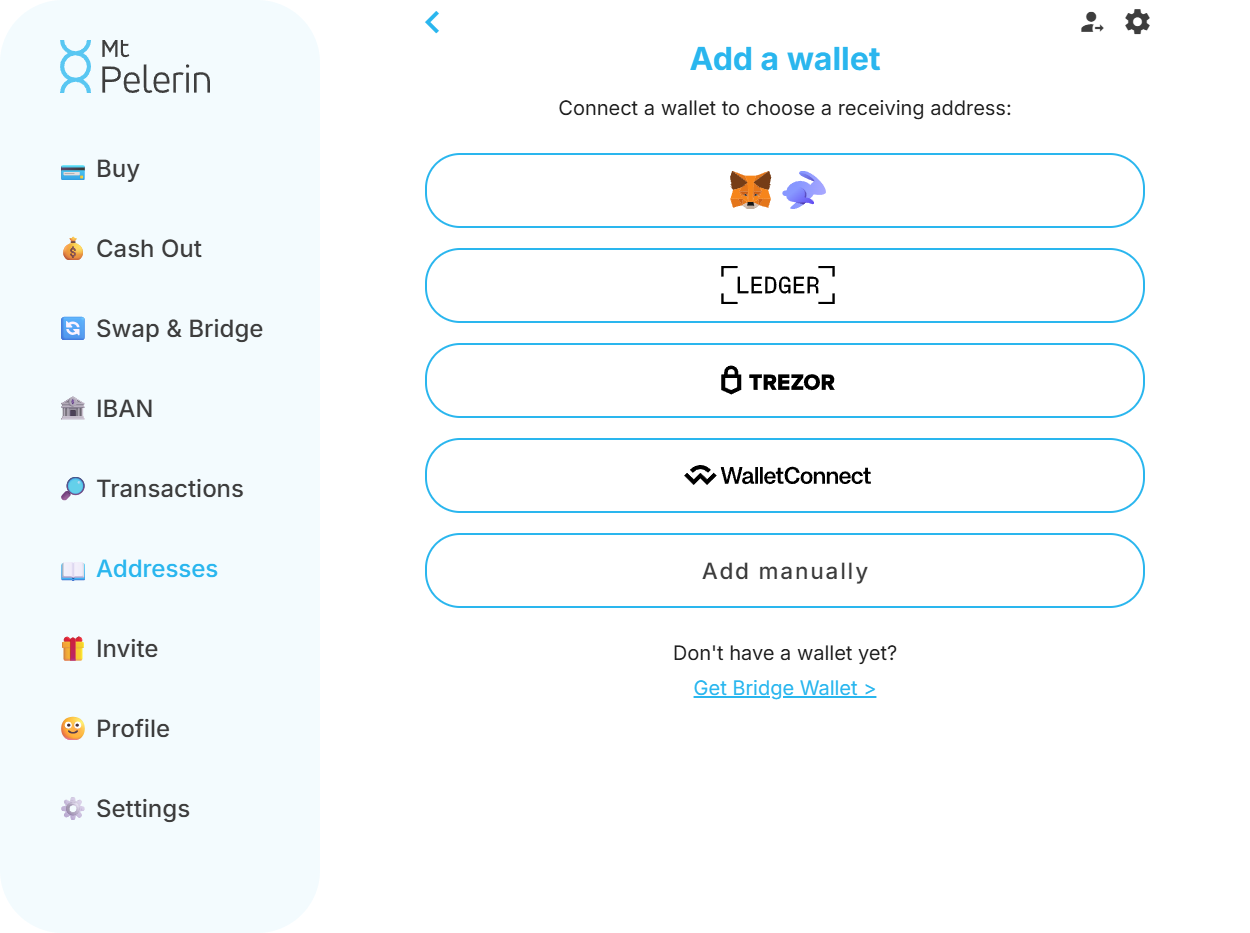
a. From a browser wallet
- ✅ This method is free and instant.
- Choose the first option with the MetaMask / Rabby icons
- Approve the signature request in the window that will open in your browser wallet (MetaMask, Rabby, Ambire, Phantom, etc)
b. With a Ledger or a Trezor
- ✅ This method is free and instant.
- Connect your Ledger or Trezor to your computer
- Make sure that it is up to date, unlocked and opened on the Ethereum app/account
- Choose the Ledger or Trezor button on our web app
- Approve the signature request that will appear on your hardware wallet
c. With any other hardware wallet
- ✅ This method is free and instant.
For this, you will need a browser wallet that supports connections with hardware wallets. We recommend using Rabby, which supports most hardware wallet brands.
Once installed on your browser, launch Rabby, choose "Connect Hardware Wallets" and follow instructions.
Then, back on the Add a wallet screen of our web app, choose the first option with the MetaMask / Rabby icons and approve the signature request in the Rabby window that will open.
d. From a mobile wallet
- ✅ This method is free and instant.
Choose WalletConnect.
If you open our web app from a computer, scan the QR code from your mobile wallet and approve the request there.
If you open our web app from a mobile phone, click on Connect and approve the request in your mobile wallet.
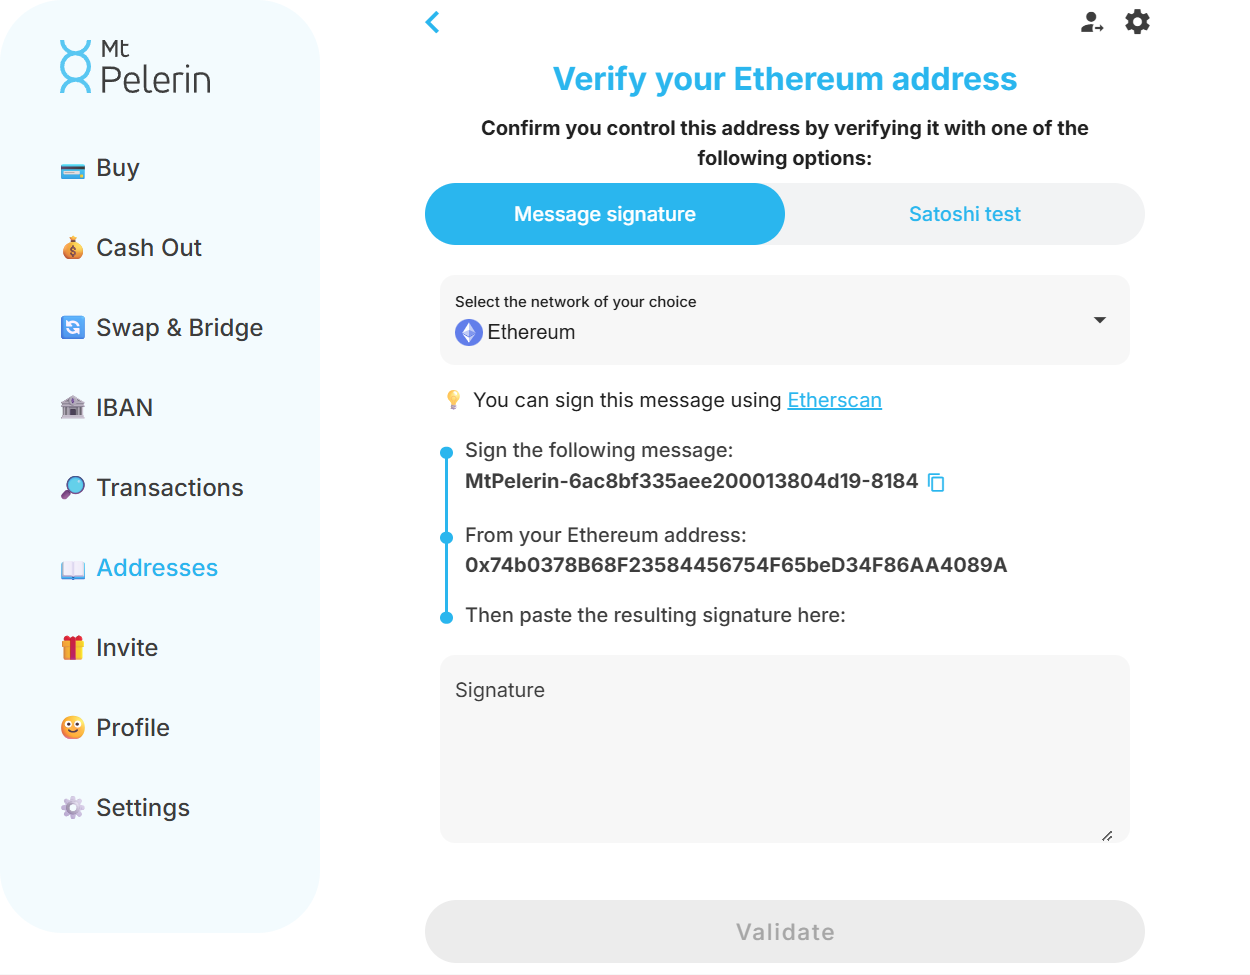
e. By message signature
- ✅ This method is free and instant.
- Choose Add manually
- Enter your 0x... wallet address
- Choose the Message signature tab
- Copy the message
- Go to etherscan.io/verifiedSignatures
- Click Sign Message
- Connect your wallet
- Paste our message in the Message field
- Click the Sign Message button
- Approve the signature in your wallet
- Copy the signature result and paste it in the Signature field of our interface
f. From any other EVM wallet
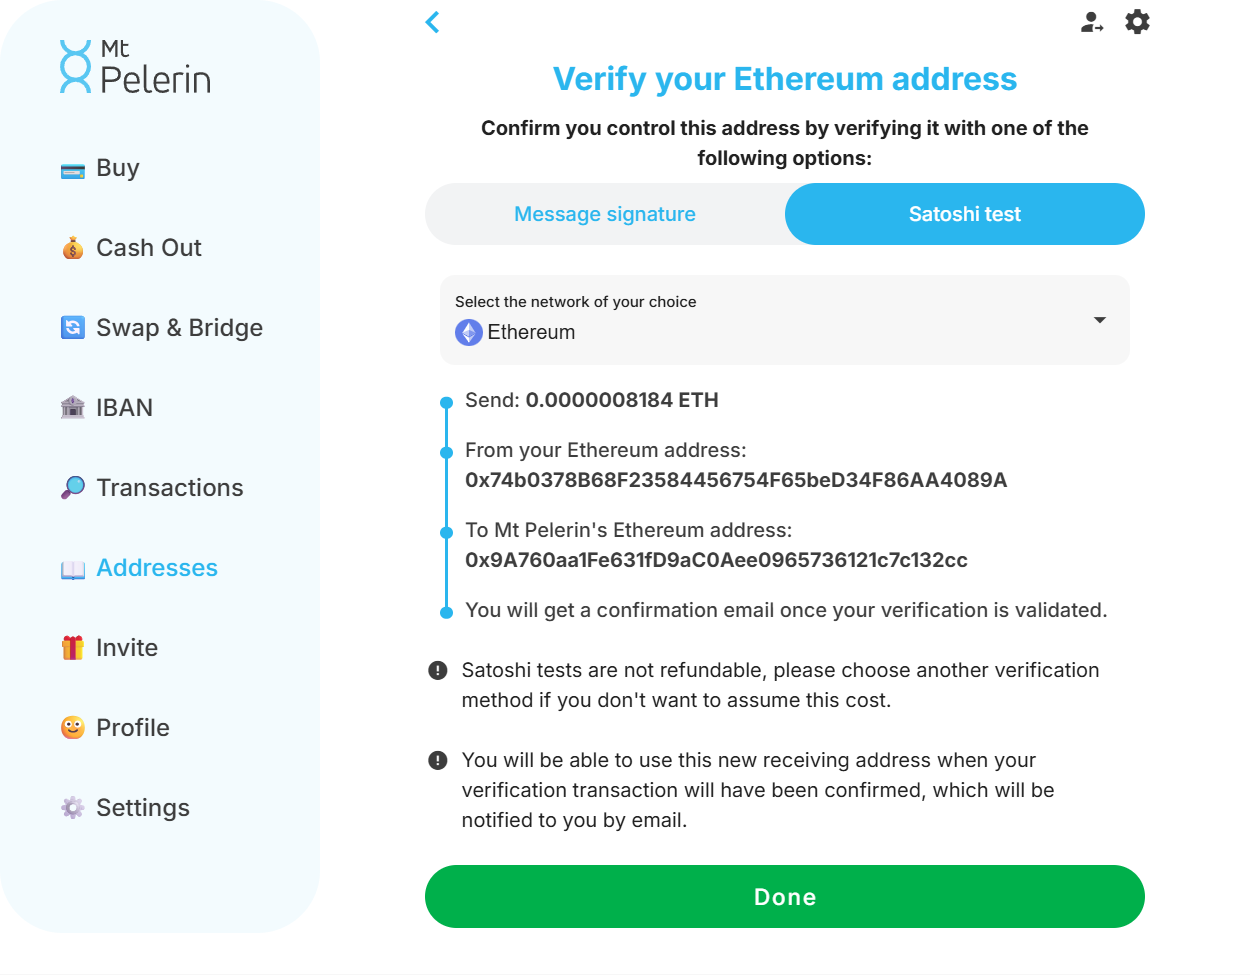
You will need to make a Satoshi test, which is a transaction of a small, precise amount sent to our verification address from the address that you want to verify.
- Choose Add manually
- Enter your 0x... wallet address
- Choose the Satoshi test tab
- Choose from which network you want to send the transaction, avoiding Ethereum as it is usually the most costly (sending from any of the other networks is virtually free, it only costs a fraction of a cent)
- Follow instructions to make your verification transaction
Make sure to send the exact amount indicated, down to the last decimal, as it is a unique code required for our system to automatically detect and validate your transaction.
In Bridge Wallet
Switch to the desired network, go in the address book tab, click on the "Add" button, enter your address and follow instructions to make your verification transaction.
- ⚠️ The amount you send is not refundable. If you would rather not pay it, use one of the five instant methods above.
- 💡 To send the transaction to your own address instead of ours, verify your address from our mobile app.
How to verify a Lightning address
- Go to our web app
- Click on the Addresses tab in the left side menu
- Click on Add a wallet
- Select Bitcoin Lightning
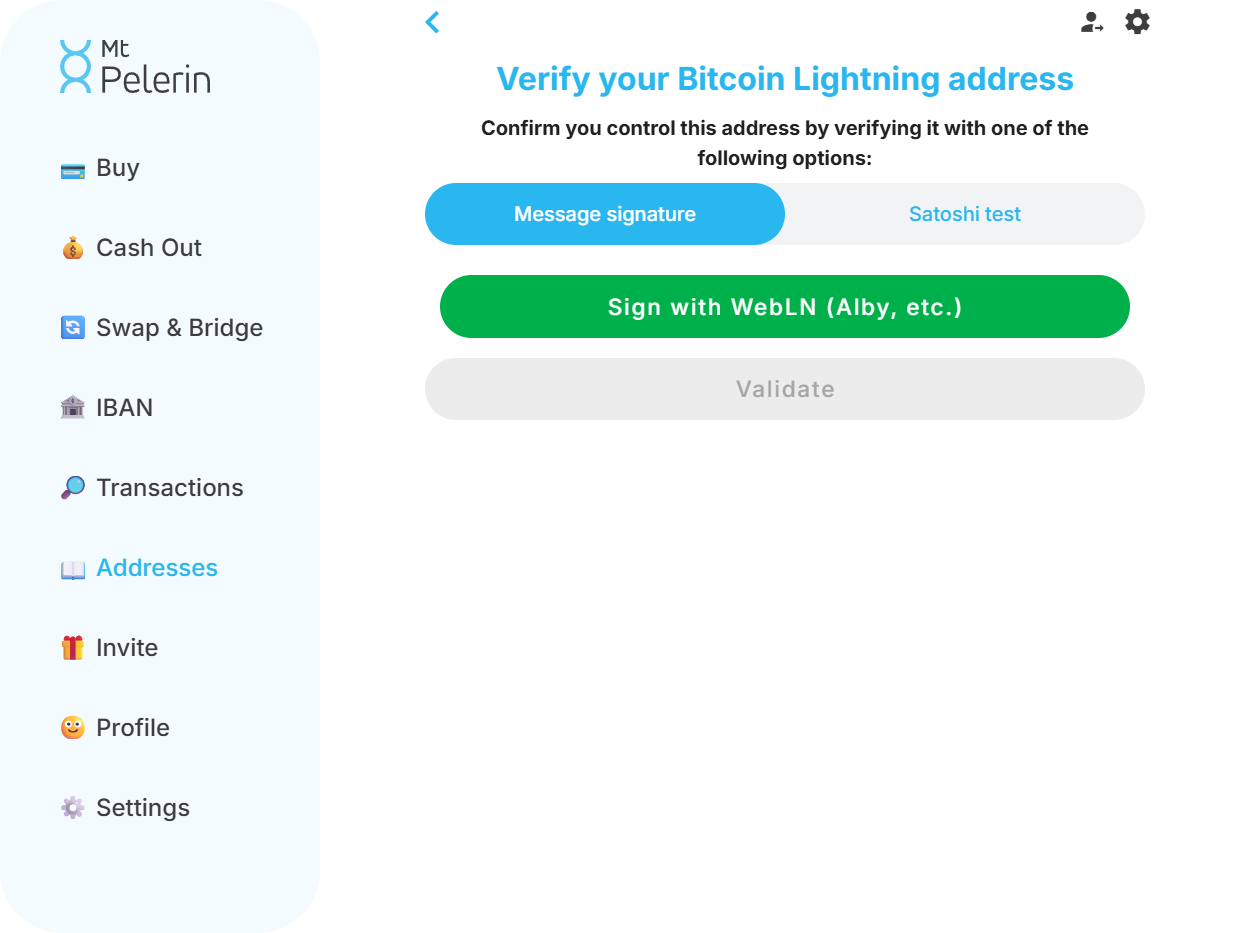
a. With a WebLN wallet
- ✅ This method is free and instant.
This method works for any Lightning browser wallet that supports WebLN, such as Alby Wallet or Joule.
- Choose Add manually
- Enter your Lightning address
- Click on the Sign with WebLN button
- Follow instructions to approve the request in the window that will open in your wallet
b. From any other Lightning wallet
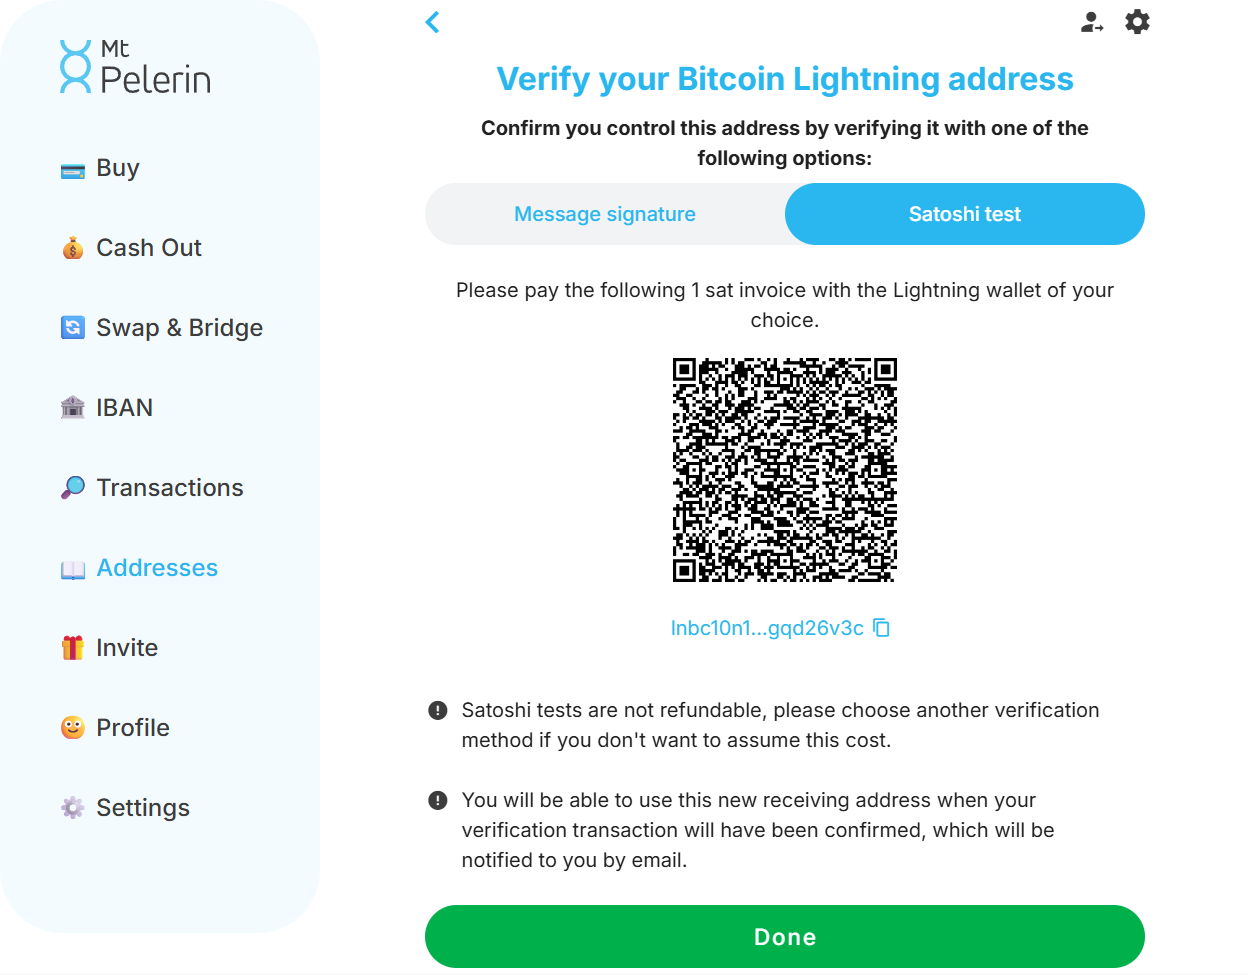
You will need to make a Satoshi test, which involves paying a Lightning invoice of 1 sat (about $ 0.001) from the address that you want to verify.
- Choose Add manually
- Enter your Lightning address
- Choose the Satoshi test tab
- Scan or copy the invoice we display, and pay it from the wallet you want to verify
Make sure to pay the invoice we display, and not a payment of your own: that invoice is the unique code required for our system to automatically detect and validate your payment.
In Bridge Wallet
Switch to the Lightning network, go in the address book tab, click on the "Add" button, enter your address and follow instructions to make your verification transaction.
- ⚠️ The sat you pay is not refundable. If you would rather not pay it, use the WebLN method above.
How to verify a Tezos address
- Go to our web app
- Click on the Addresses tab in the left side menu
- Click on Add a wallet
- Select Tezos
a. From any Tezos wallet
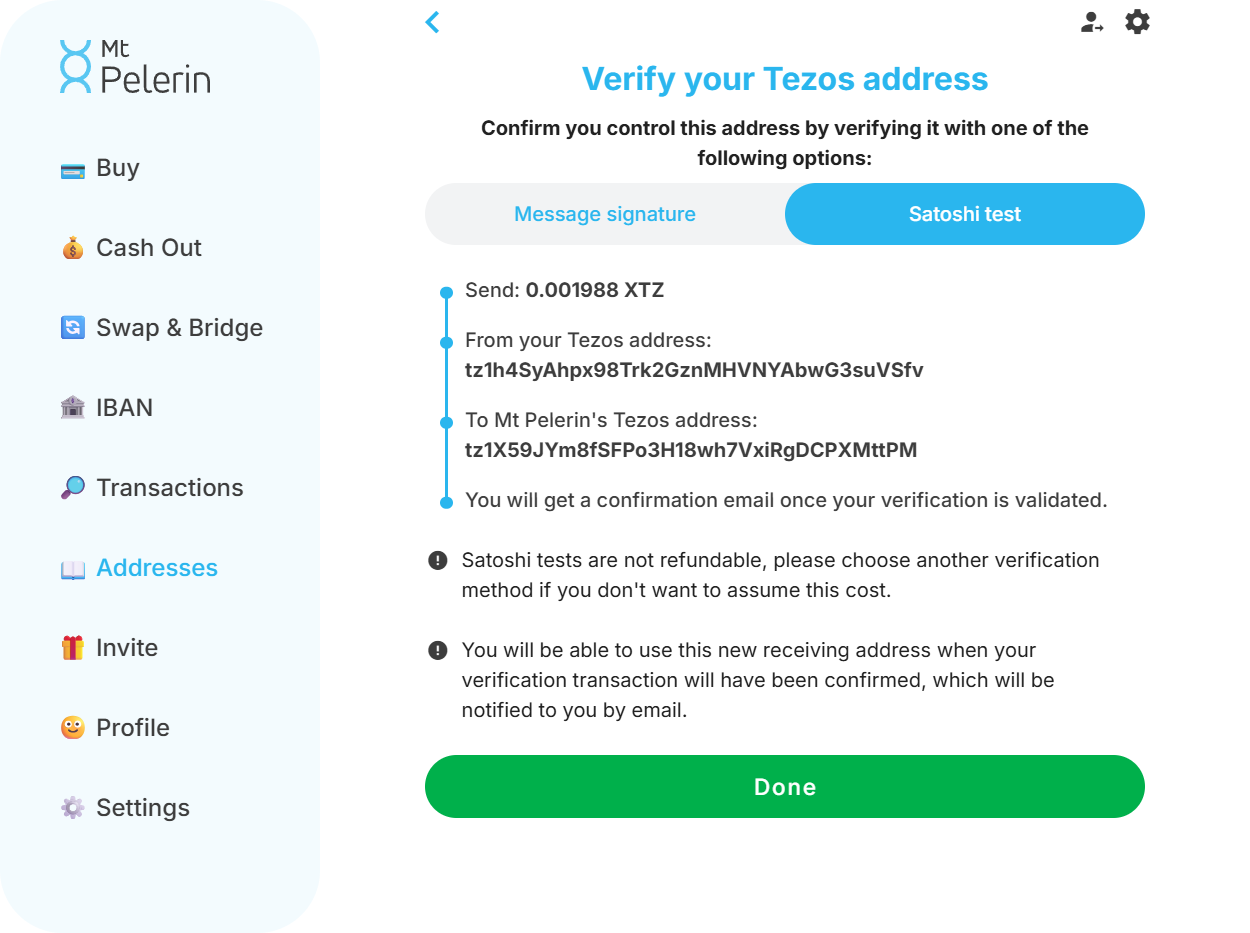
You will need to make a Satoshi test, which is a transaction of a small, precise amount of XTZ sent from the address that you want to verify to our verification address.
- Choose Add manually
- Enter your Tezos address
- Choose the Satoshi test tab
- Follow instructions to make your verification transaction
Make sure to send the exact amount indicated, down to the last decimal, as it is a unique code required for our system to automatically detect and validate your transaction.
In Bridge Wallet
Switch to the Tezos network, go in the address book tab, click on the "Add" button, enter your address and follow instructions to make your verification transaction.
- ⚠️ The amount you send is not refundable. If you would rather not pay it, use the message signature method below.
- 💡 To send the transaction to your own address instead of ours, verify your address from our mobile app.
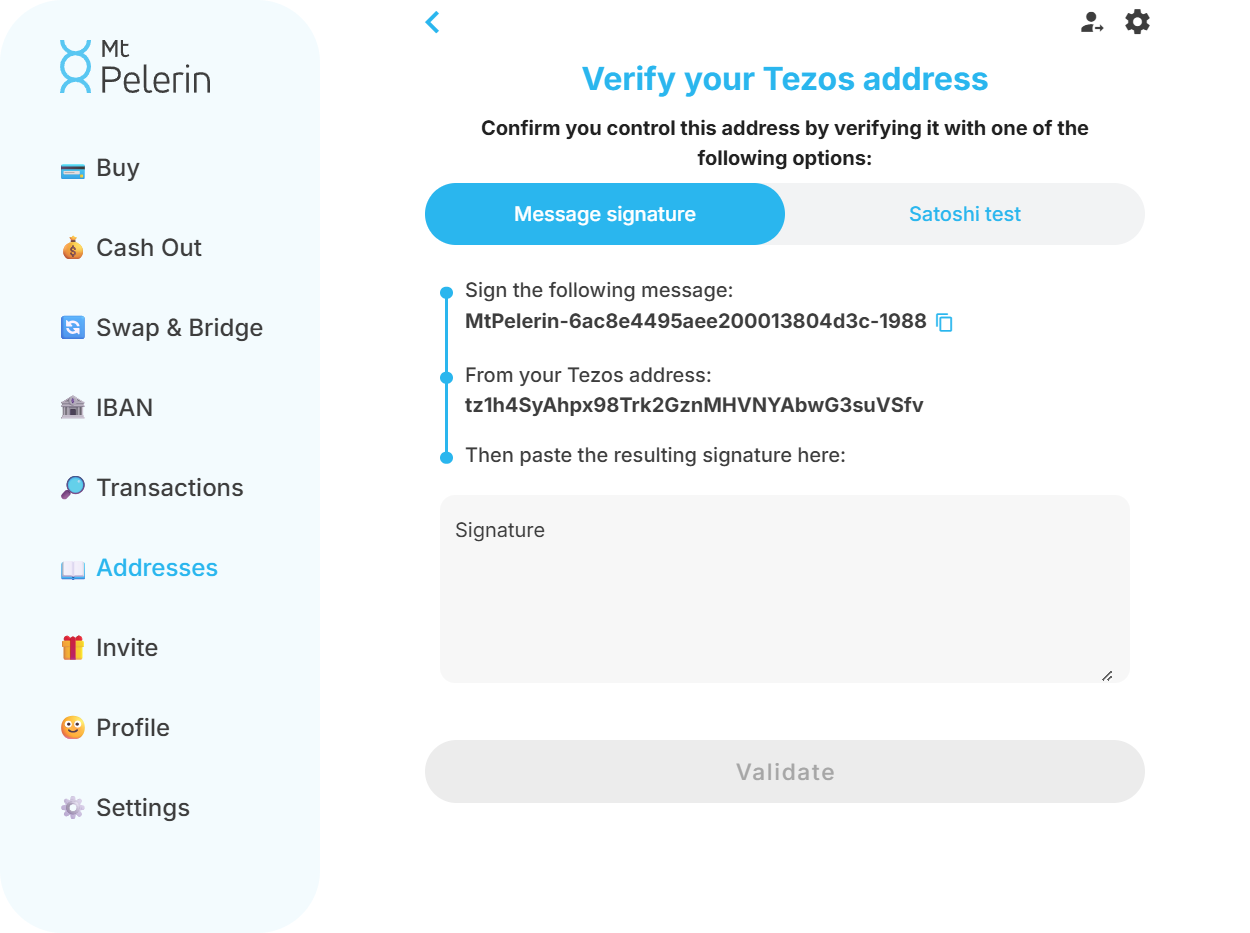
b. By message signature
- ✅ This method is free and instant.
- Choose Add manually
- Enter your Tezos address
- Copy the message shown in our web app
- Sign it with your Tezos wallet
- Paste the result in the Signature field
Waiting for the confirmation
If you have added an address by connecting your wallet or by signing a message, the verification is instant and you will receive an email confirming the verification of your address right away.
If you have added an address through a verification transaction (Satoshi test), the verification is automatically done within 15 minutes in most cases, but it can sometimes take up to 48 hours in case of network congestion. You will receive an email as soon as it is confirmed, and the address will then be selectable for all your future transactions.

About the author
Yann is the head of marketing of Mt Pelerin. He fell down the rabbit hole of crypto at the end of 2017, when he joined the assembling team that would give birth to Mt Pelerin.


